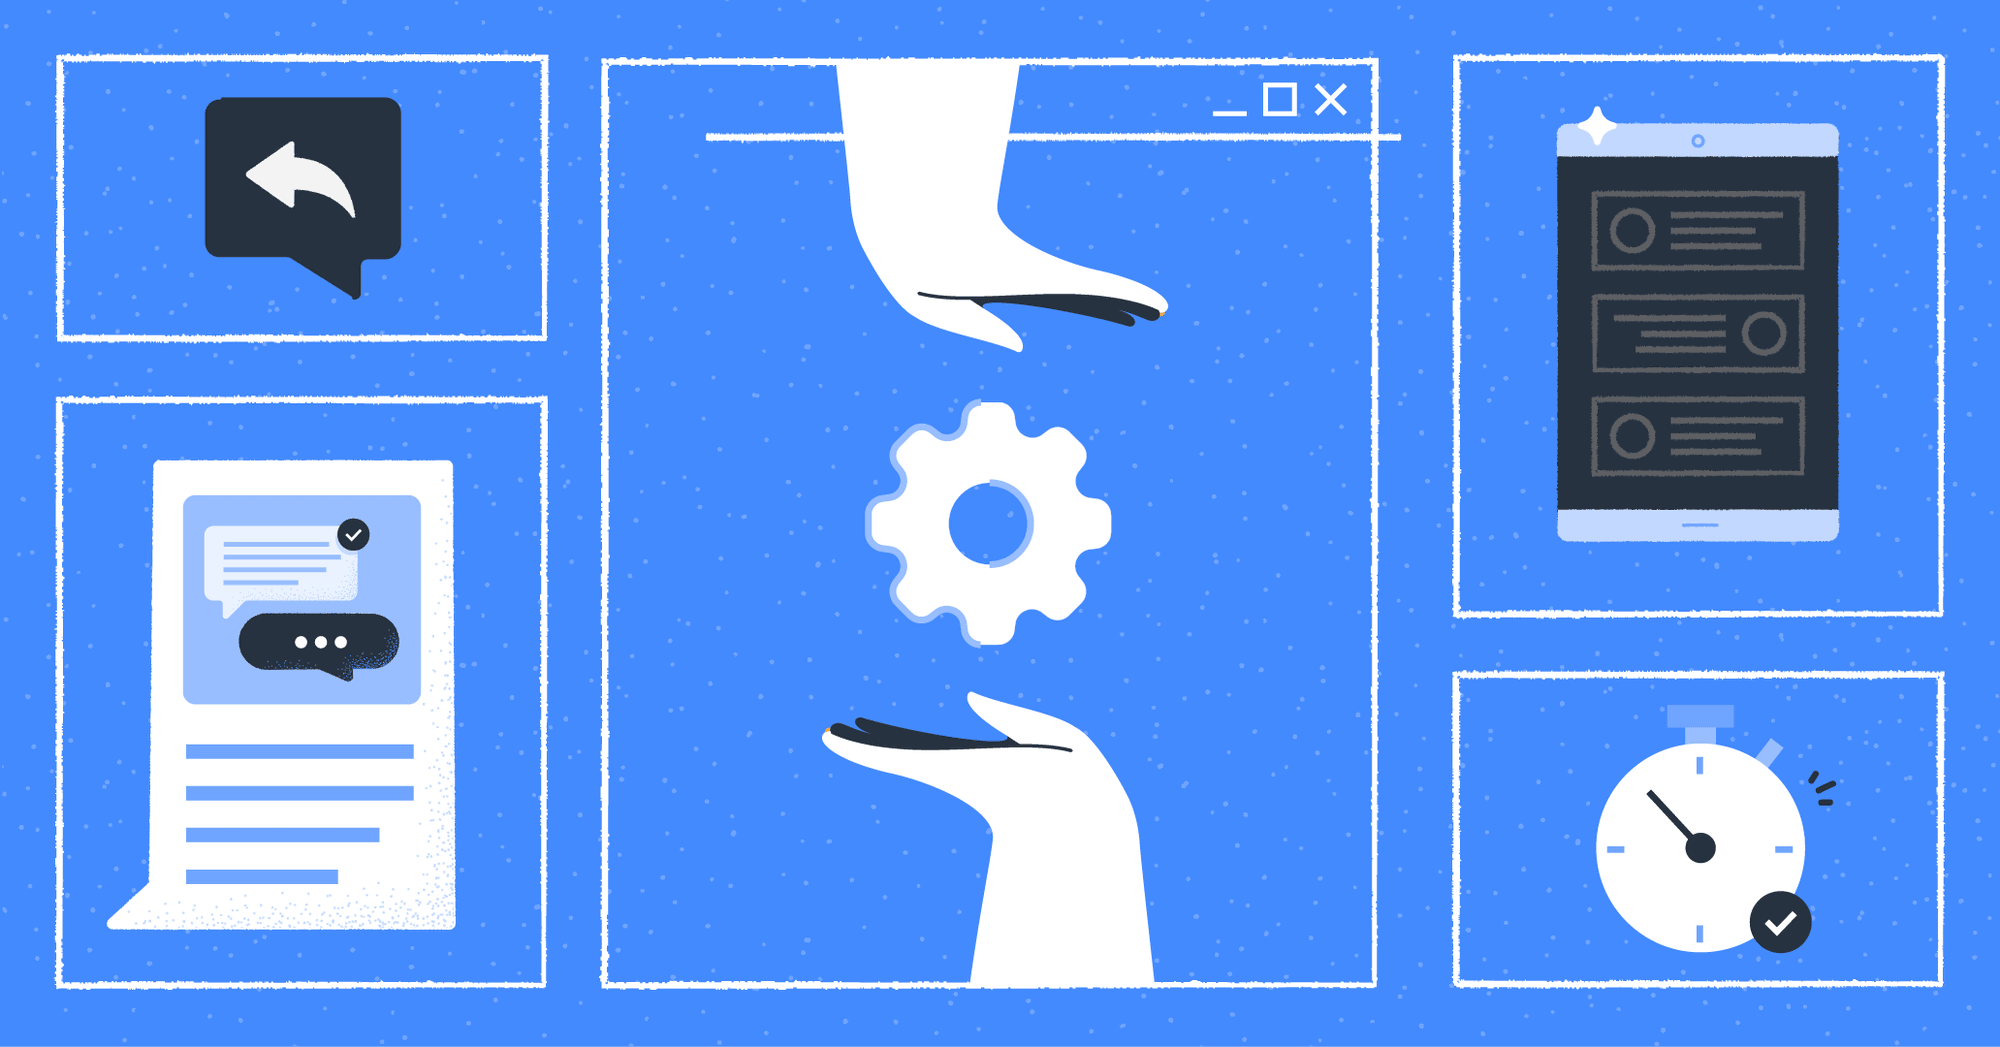
กําลังมองหาวิดเจ็ตแชทที่ดีที่สุดอยู่ใช่ไหม หากผู้เยี่ยมชมเว็บของคุณเป็นผู้ใช้ Messenger ตัวยง ให้เพิ่ม Facebook Messenger วิดเจ็ตไปยังเว็บไซต์ของคุณ ในโพสต์บล็อกนี้ เราจะแสดงวิธีเพิ่ม Facebook Messenger ไปยังเว็บไซต์รวมถึงตําแหน่งที่จะเพิ่มลงในผู้สร้างเว็บไซต์เช่น WordPress, Wix และ Shopify.

ก. คืออะไร Facebook Messenger วิด เจ็ต
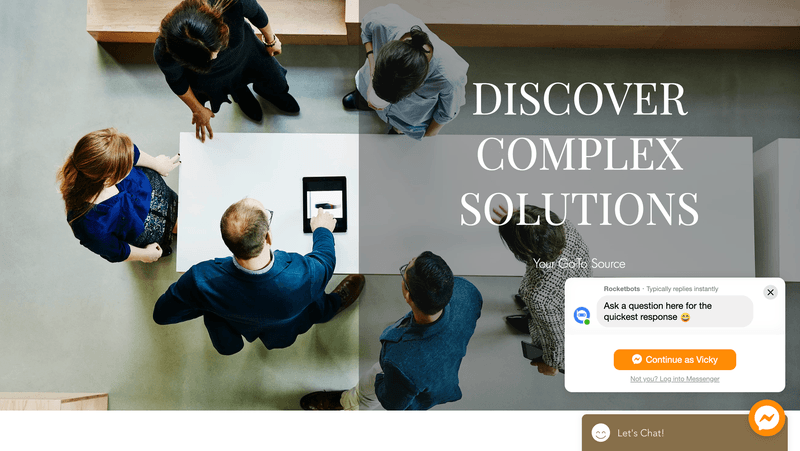
ดิ Facebook Messengerวิดเจ็ตเป็นปลั๊กอินเว็บไซต์ที่ช่วยให้ผู้เยี่ยมชมไซต์สามารถแชทกับเพจ Facebook ของคุณผ่าน Messenger ในฐานะที่เป็นหนึ่งในช่องทางการส่งข้อความชั้นนําของโลกลูกค้าจํานวนมากมีแนวโน้มที่จะแชทผ่าน Messenger
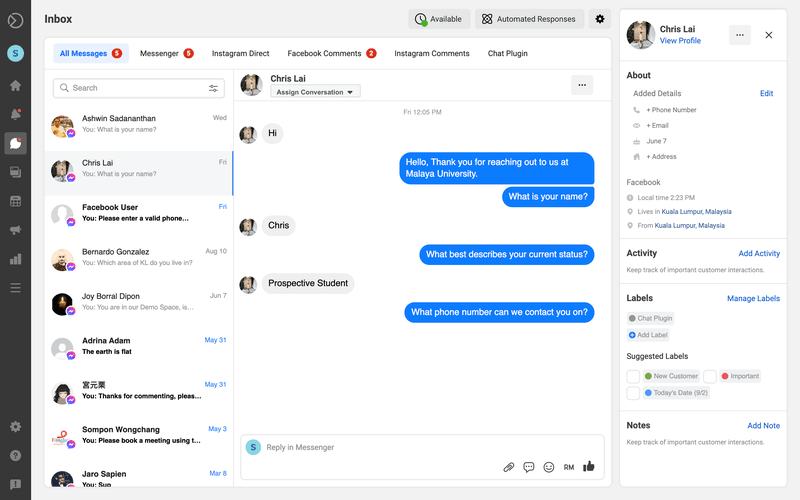
เมื่อผู้เยี่ยมชมเว็บไซต์ส่งคําถามผ่านวิดเจ็ต คุณสามารถตอบกลับผ่าน Meta กล่องจดหมายเข้า Business Suite ซึ่งเพียงพอสําหรับธุรกิจที่ได้รับข้อความปริมาณน้อยถึงปานกลางและพึ่งพา Facebook Messenger สําหรับการสื่อสารกับลูกค้า
<call-out> Do not mistake the Facebook Messenger widget with the Facebook Chat Plugin. While similar in some aspects, the Facebook Chat Plugin is no longer available from May 9, 2024. <call-out>
ธุรกิจที่จัดการการสนทนาจํานวนมากหรือแชทกับลูกค้าในหลายช่องทางควรใช้กล่องจดหมายการส่งข้อความแบบ Omnichannel เช่น respond.io. นอกเหนือจากการปรับปรุงการสนทนาทั้งหมดในกล่องจดหมายเดียวแล้ว ยังให้ประโยชน์เพิ่มเติม เช่น ระบบอัตโนมัติขั้นสูงและการวิเคราะห์
ทําไมต้องใช้ Facebook Messenger วิด เจ็ต
หากคุณกําลังใช้ประโยชน์จาก Facebook Messenger เพื่อให้การสนับสนุนลูกค้าหรือผลักดันยอดขาย คุณรู้ว่าแพลตฟอร์มมีประสิทธิภาพเพียงใด เหตุผลสําคัญที่ควรพิจารณาใช้เว็บแชทบน Facebook คือความสามารถในการสร้างการสนทนาอย่างต่อเนื่องและสร้างรายชื่อผู้ติดต่อ
สร้างการมีส่วนร่วมอย่างต่อเนื่องและสม่ําเสมอ
ด้วยการแชทบนเว็บไซต์แบบดั้งเดิมคุณจะสูญเสียผู้ใช้ไปตลอดกาลเมื่อพวกเขาออกจากเว็บไซต์ของคุณ ความหวังเดียวของคุณในการสนทนาต่อคือให้พวกเขากลับมาที่ไซต์ของคุณ นี่ไม่ใช่กรณีอีกต่อไปเมื่อคุณเพิ่ม Messenger ลงในเว็บไซต์ของคุณ
ประการแรกวิดเจ็ต Messenger เป็นเครื่องมือที่เร็วที่สุดสําหรับลูกค้าของคุณในการเข้าถึงคุณและแก้ไขปัญหาของพวกเขา ช่วยให้มั่นใจได้ว่าลูกค้าสามารถติดต่อคุณได้ทันทีและง่ายดายบนผู้ส่งสารที่คุ้นเคยและสะดวกสบาย
นอกจากนี้ยังช่วยให้สามารถสื่อสารส่วนบุคคลได้โดยตรงบนเว็บไซต์ของคุณเพื่อให้การสนับสนุนด้านเทคนิคการให้คําปรึกษาด้านผลิตภัณฑ์ความช่วยเหลือในการสั่งซื้อหรือการจองและอื่น ๆ ลูกค้าสามารถติดต่อคุณได้ในขณะที่ดอกเบี้ยสูงเพื่อกระตุ้นการแปลงยอดขาย
เมื่อคุณเพิ่มแชทบน Facebook ไปยังเว็บไซต์ ประวัติการแชทของผู้ติดต่อจะถูกบันทึกไว้ใน Meta กล่องจดหมายของ Business Suite ซึ่งหมายความว่าคุณสามารถสนทนาต่อกับผู้ใช้ที่แชทกับคุณบน Messenger ได้แม้ว่าพวกเขาจะออกจากเว็บไซต์ของคุณแล้วก็ตาม
นอกจากการสนทนาแล้ว คุณยังได้เห็นข้อมูลโปรไฟล์พื้นฐานบางอย่างของพวกเขา เช่น ชื่อ รูปโปรไฟล์ วันเกิด และสถานที่ สิ่งนี้จะช่วยให้คุณให้บริการลูกค้าได้ดีกว่าการแชทสดใด ๆ และสร้างความสัมพันธ์กับพวกเขาเมื่อเวลาผ่านไป
สร้าง Facebook Messenger รายชื่อผู้ติดต่อ
ตอนนี้ผู้คนสามารถส่งข้อความถึงคุณได้อย่างง่ายดายผ่าน Facebook โดยใช้ Facebook Customer Chat พวกเขาจะถูกเพิ่มลงในรายชื่อผู้ติดต่อของคุณตลอดไป
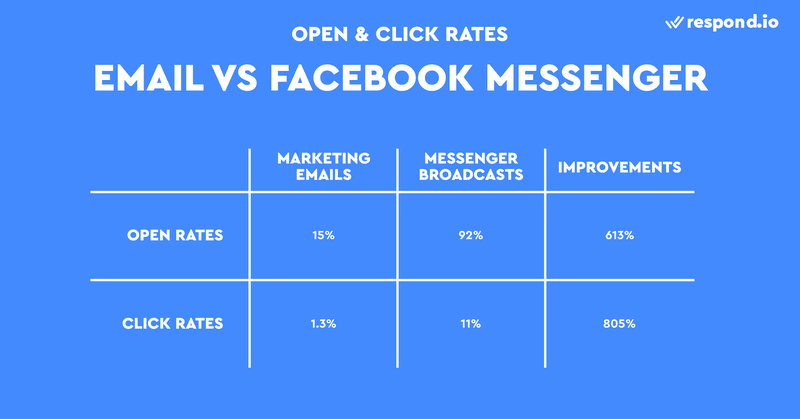
คุณสามารถนึกถึง Facebook Messenger รายชื่อสมาชิกในลักษณะเดียวกับที่คุณทํารายชื่อสมาชิกอีเมล ใช้นี่เป็นช่องทางการสื่อสารใหม่กับผู้ชมของคุณ หรือแม้แต่ใช้เพื่อส่ง การออกอากาศของ Messenger ซึ่งมีอัตราการเปิดสูงถึง 92 เปอร์เซ็นต์
วิดเจ็ต Messenger เป็นเพียงวิธีหนึ่งในการสร้าง Facebook Messenger รายชื่อสมาชิก มีหลายวิธีในการขยายผู้ติดต่อ Messenger ของคุณ รวมถึงการตอบกลับอัตโนมัติความคิดเห็นของ Facebook หรือการตอบกลับส่วนตัว โฆษณาหรือลิงก์คลิกเพื่อ Messenger และรหัส QR ของ Facebook
สุดท้ายนี้ โปรดจําไว้ว่าลูกค้าต้องลงชื่อเข้าใช้บัญชี Facebook ของตนเพื่อเพิ่มลงในรายชื่อผู้ติดต่อของคุณ เมื่อคํานึงถึงสิ่งนี้ เรามาดูส่วนถัดไป ซึ่งคุณจะได้เรียนรู้วิธีเพิ่ม Messenger ลงในเว็บไซต์
วิธีสร้างรหัสวิดเจ็ต
ก่อนอื่นเรามาพูดถึงขั้นตอนการตั้งค่าวิดเจ็ต Messenger เพื่อเพิ่ม Facebook Messenger ในเว็บไซต์คุณต้องทําสองขั้นตอนเหล่านี้ตามลําดับ:
- สร้าง Facebook Messenger รหัสวิดเจ็ต
- เพิ่มโค้ดวิดเจ็ต Messenger ลงในเว็บไซต์ของคุณ
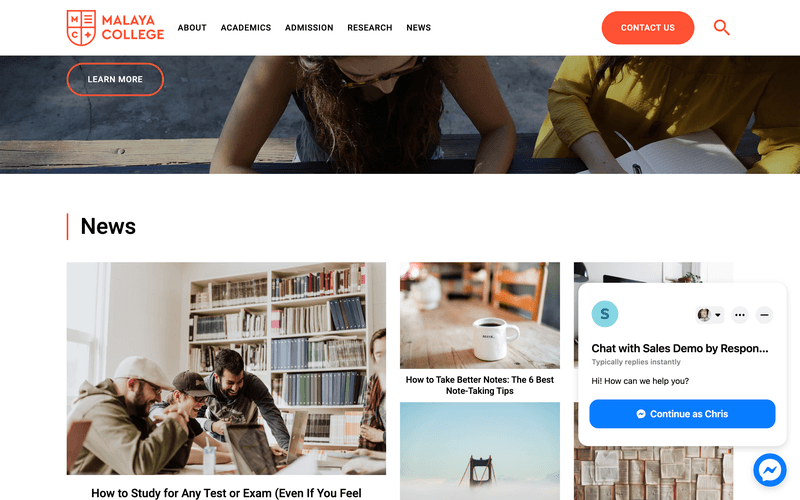
หากคุณเป็นธุรกิจ B2B ที่ต้องเปิดโหมดผู้มาเยือนเราขอแนะนําให้ตั้งค่าของคุณ Facebook Messenger วิดเจ็ตผ่าน respond.io.
ไม่เพียงแต่คุณสามารถทําให้คําทักทายหรือข้อความระบุว่าไม่อยู่เป็นไปโดยอัตโนมัติ และกระบวนการต่างๆ เช่น การกําหนดเส้นทางการแชทหรือการมอบหมายผู้ติดต่อrespond.io ให้คุณ เพิ่มรหัสอ้างอิง ลงใน Facebook Messenger วิดเจ็ตเพื่อระบุว่าผู้ติดต่อมาจากไหน ธุรกิจขนาดใหญ่ควรพิจารณาตัวเลือกนี้
สร้างรหัสวิดเจ็ตบน respond.io
ขั้นตอนการตั้งค่า Facebook Messenger วิดเจ็ตนั้นเรียบง่ายและสามารถทําได้อย่างรวดเร็วโดยทําตามขั้นตอนเหล่านี้
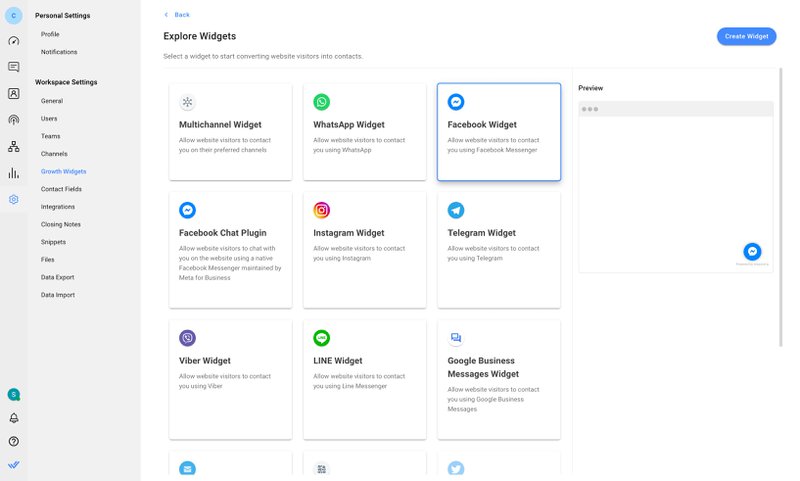
ในการเริ่มต้น ให้ไปที่การตั้งค่า>วิดเจ็ตการเติบโต จากนั้นคลิก เพิ่มวิดเจ็ต และเลือก วิดเจ็ต Facebook ก่อนคลิก สร้างวิดเจ็ต
หลังจากนั้น เข้าสู่เว็บไซต์ที่คุณต้องการเพิ่มวิดเจ็ตแชทและเลือกบัญชีที่คุณต้องการสร้างวิดเจ็ต
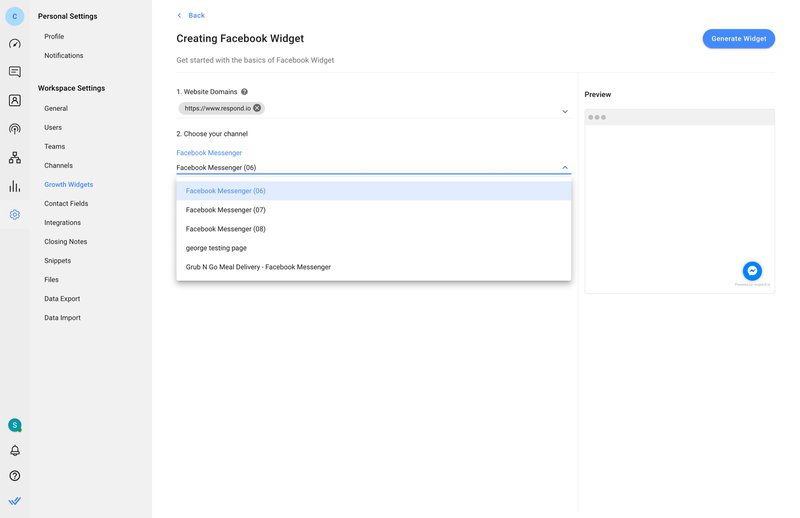
คุณสามารถเพิ่มข้อความที่กรอกไว้ล่วงหน้าหรือปรับแต่งรูปลักษณ์ของวิดเจ็ตได้โดยคลิกที่ปุ่ม การตั้งค่าขั้นสูง สุดท้ายคลิก สร้างวิดเจ็ตคัดลอกสคริปต์ที่สร้างขึ้นและติดตั้งบนเว็บไซต์ของคุณ
หากคุณต้องการเชื่อมต่อกับลูกค้าในหลายช่องทาง วิดเจ็ต Omnichannel สามารถช่วยได้ คุณยังสามารถเลือกที่จะเพิ่มวิดเจ็ตแชทบนเว็บไซต์ของคุณ
ตอนนี้คุณตั้งค่าวิดเจ็ต Messenger เรียบร้อยแล้วขั้นตอนต่อไปคือการติดตั้งโค้ดที่สร้างขึ้นบนเว็บไซต์ของคุณ เราจะแนะนําคุณตลอดขั้นตอนการติดตั้งต่อไป
วิธีการเพิ่ม Facebook Messenger ไปยังเว็บไซต์
การนําทาง CMS ของคุณเพื่อเพิ่มวิดเจ็ตแชทอาจทําให้สับสนได้ ด้านล่างนี้คุณจะพบคําแนะนําในการติดตั้งโค้ดวิดเจ็ต Messenger บนเครื่องมือสร้างเว็บไซต์ยอดนิยมเช่น WordPress, วิกซ์, Shopify และ Squarespace.
วิธีเพิ่ม Messenger ไปยังเว็บไซต์: WordPress
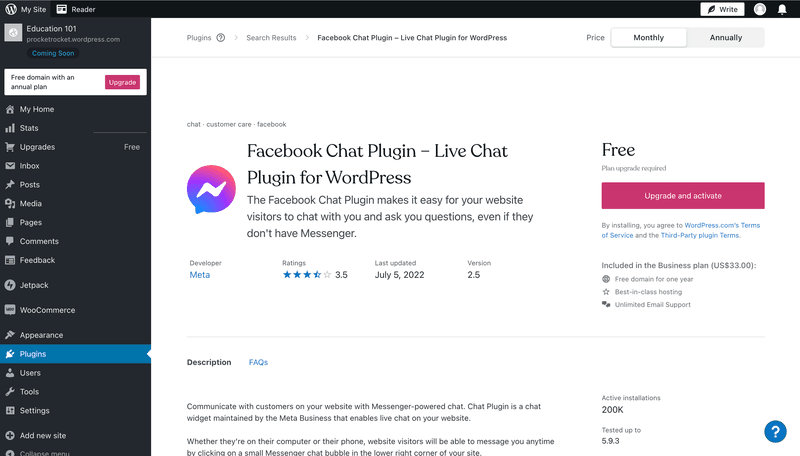
ตอนนี้คุณสามารถติดตั้งปลั๊กอิน Messenger ได้โดย Meta โดยตรงจากแท็บปลั๊กอินในแถบด้านข้าง แม้ว่าปลั๊กอินจะให้บริการฟรี แต่การติดตั้งมีให้สําหรับสมาชิกแผนธุรกิจหรือผู้ใช้แผน Pro สําหรับผู้ที่ใช้แผนเดิม
เพื่อเพิ่ม Facebook Messenger ไปยังเว็บไซต์บน WordPressให้ทําตามคําแนะนําเหล่านี้:
- ค้นหา Facebook Messenger วิดเจ็ตและเลือก
- คลิก ติดตั้งเดี๋ยวนี้
- คลิกเปิดใช้งาน
- มองหาแท็บที่ระบุว่าแชทของลูกค้า ไปที่ส่วนเริ่มต้นใช้งานแล้วคลิกแก้ไขปลั๊กอินแชท
- ปรับแต่งปลั๊กอินแชทของคุณและตั้งค่าให้เสร็จสิ้น
อีกวิธีหนึ่งคือ รวม Messenger เข้ากับ WordPress ไซต์โดยใช้รหัสวิดเจ็ต Messenger นอกจากนี้ยังต้องผ่านเพย์วอลล์ คุณสามารถเพิ่มรหัสวิดเจ็ต Messenger ได้สองสามวิธี WordPressรวมถึงการติดตั้งปลั๊กอินส่วนหัวและส่วนท้าย
1. เพิ่ม ปลั๊กอินส่วนหัวและส่วนท้ายที่คุณเลือกจากหน้าปลั๊กอิน
2. ไปที่ ส่วนหัวและส่วนท้าย
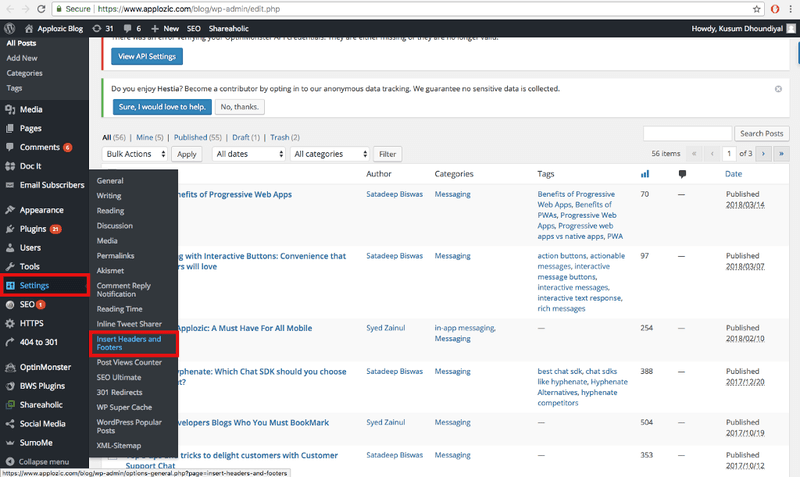
3. เพิ่ม Facebook Messenger สคริปต์วิดเจ็ตไปที่ส่วนท้าย
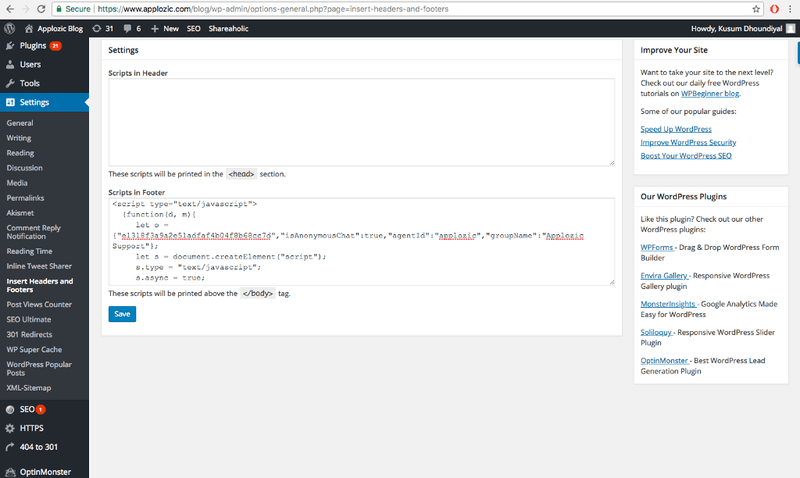
คุณได้เพิ่มแล้ว Facebook Messenger แชทสดกับคุณ WordPress เว็บไซต์.
วิธีเพิ่ม Messenger ในเว็บไซต์: Wix
จะทําอย่างไรถ้าคุณต้องการเพิ่มแชทสดในเว็บไซต์ Wix? เมื่อคุณสร้าง Facebook Messenger สคริปต์วิดเจ็ตทําตามขั้นตอนด้านล่างเพื่อเพิ่มลงในเว็บไซต์ Wix ของคุณ โปรดทราบว่าคุณจะต้องสมัครสมาชิกแบบชําระเงินเพื่อเข้าถึงคุณลักษณะนี้
1. ไปที่การตั้งค่า > การตั้งค่าขั้นสูง>รหัสที่กําหนดเอง
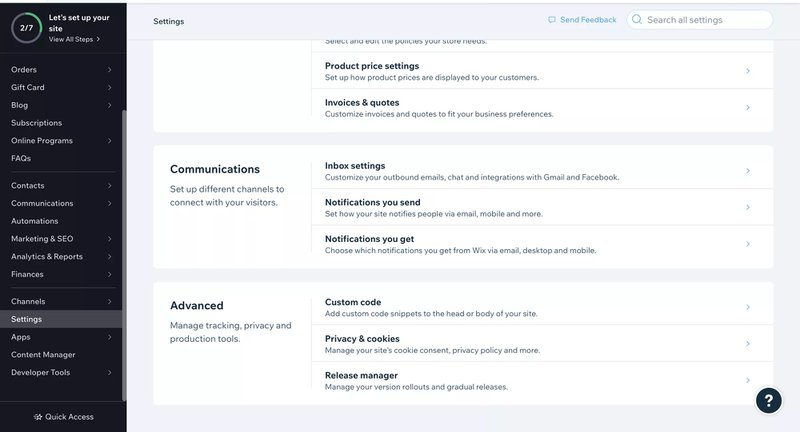
2. วาง Facebook Messenger รหัสวิดเจ็ตและเลือกหน้าที่คุณต้องการใช้รหัส ตรวจสอบให้แน่ใจว่าคุณวางรหัสใน Body - end
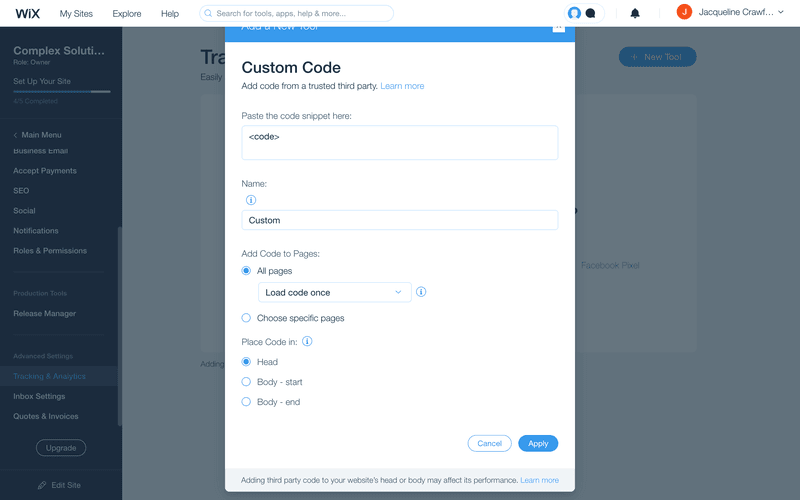
ตอนนี้คุณได้เพิ่มวิดเจ็ตแชท Facebook ลงในเว็บไซต์ Wix ของคุณแล้ว
วิธีเพิ่ม Messenger ไปยังเว็บไซต์: Shopify
เมื่อคุณมีสคริปต์วิดเจ็ต Facebook Chat แล้ว ให้ทําตามขั้นตอนเหล่านี้เพื่อรวมเข้าด้วยกัน Facebook Messenger ลงใน Shopify เว็บไซต์.
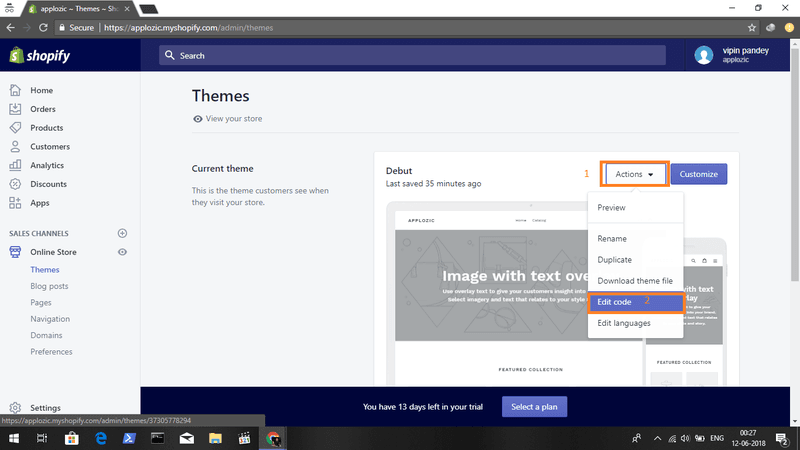
1. ไปที่ ร้านค้าออนไลน์และแก้ไขโค้ด
2. เปิด ส่วน footer.liquid และวาง Facebook Messenger สคริปต์วิดเจ็ต
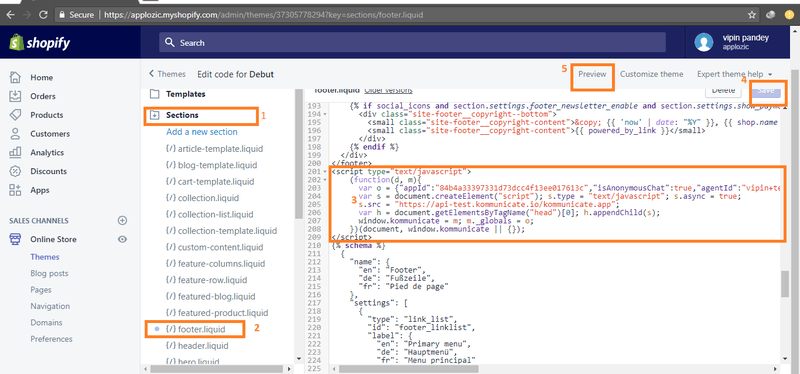
ตอนนี้คุณได้เพิ่มวิดเจ็ตแชทบน Facebook แล้ว Shopify เว็บไซต์.
วิธีเพิ่ม Messenger ไปยังเว็บไซต์: Squarespace
เมื่อคุณมีสคริปต์วิดเจ็ต Facebook Chat แล้ว ก็ถึงเวลาฝัง Messenger ใน Squarespace เว็บไซต์.
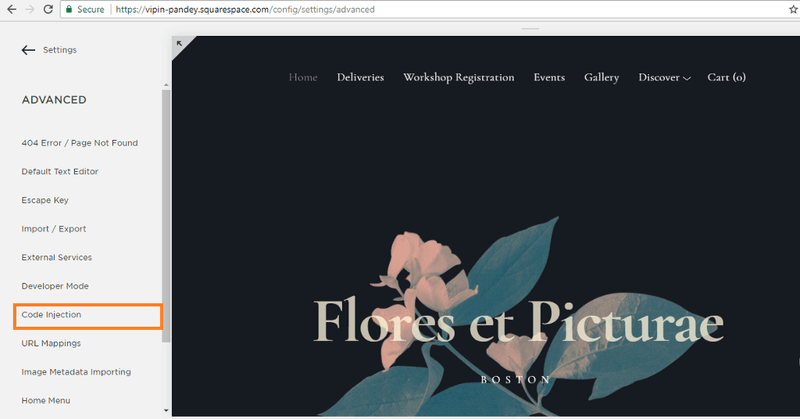
1. เข้าสู่ระบบ Squarespaceเลือกเว็บไซต์ของคุณและเปิดการตั้งค่า
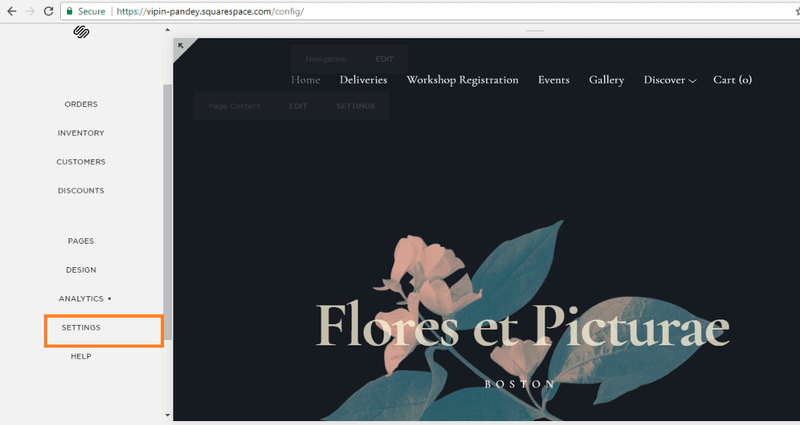
2. ไปที่การตั้งค่าขั้นสูง
3. ไปที่ Code Injection
4. วาง Facebook Messenger สคริปต์วิดเจ็ต
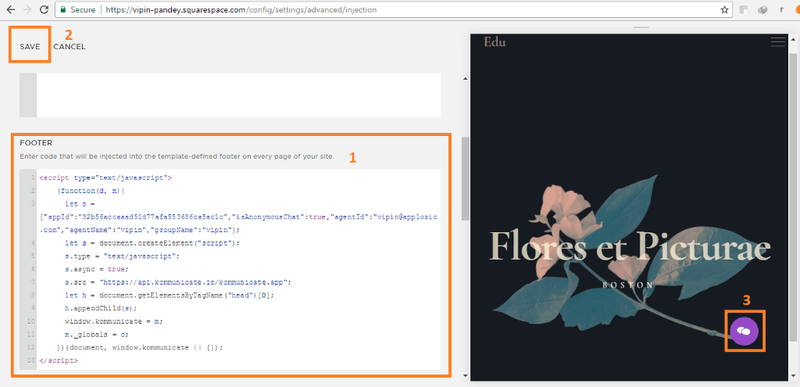
คุณได้เพิ่มแล้ว Facebook Messenger แชทสดไปยังเว็บไซต์ของคุณ
เราได้แสดงวิธีสร้างโค้ดวิดเจ็ตแชทบน Facebook และติดตั้งวิดเจ็ตแชทบน Facebook บนเครื่องมือสร้างเว็บไซต์ยอดนิยมบางตัว ต้องการแชทกับลูกค้าบนวิดเจ็ต Messenger และช่องทางอื่นๆ ตลอดจนเข้าถึงรายละเอียดการติดต่อและประวัติการแชทในกล่องจดหมายส่วนกลางหรือไม่ ลงทะเบียนสําหรับ respond.io บัญชี ตอนนี้
อ่านเพิ่มเติม
และนั่นคือวิธีที่คุณได้รับวิดเจ็ต Messenger เพื่อเพิ่ม Facebook Messenger ไปยังเว็บไซต์ของคุณ หากคุณสนุกกับการอ่านเกี่ยวกับวิธีขยายธุรกิจของคุณด้วยวิดเจ็ตแชทขั้นสูงสุดเรียนรู้เพิ่มเติมเกี่ยวกับการส่งข้อความโต้ตอบแบบทันทีสําหรับธุรกิจด้วยโพสต์บล็อกเหล่านี้:
- วิธีใช้การรวม WhatsApp กับเว็บไซต์
- สุดยอดคู่มือสําหรับ Telegram ธุรกิจ
- สุดยอดคู่มือสําหรับ Viber สําหรับธุรกิจ